Understanding the heel x ray position is crucial for accurate diagnosis by medical professionals. Radiology departments rely on standardized techniques to ensure image quality, impacting subsequent treatment decisions. Proper patient positioning protocols, as outlined by organizations like the American College of Radiology, minimize artifacts and enhance visualization of anatomical structures. The Calcaneus, the bone primarily assessed, demands specific positioning to highlight potential fractures or abnormalities; therefore the proper heel x ray position is vital.
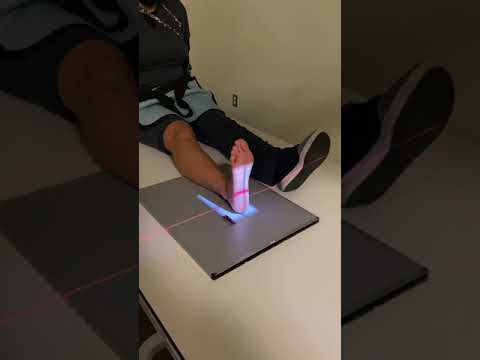
Image taken from the YouTube channel XrayImagingLady , from the video titled Calcaneus X-ray Positioning .
Heel X-Ray Position: Your Comprehensive Guide!
An accurate heel X-ray is crucial for diagnosing various foot conditions. This guide provides a detailed overview of standard "heel x ray position" techniques, focusing on proper patient positioning and technical factors.
Why Proper Heel X-Ray Position Matters
Incorrect positioning can lead to misdiagnosis and unnecessary repeat exposures. Achieving optimal "heel x ray position" ensures clear visualization of the calcaneus (heel bone), surrounding soft tissues, and any potential abnormalities.
- Accurate Diagnosis: Allows for the identification of fractures, bone spurs, arthritis, and other pathologies.
- Reduced Radiation Exposure: Correct positioning minimizes the need for repeat imaging.
- Improved Image Quality: Provides a clear and detailed view of the heel.
Standard Heel X-Ray Views
The most common views for a heel X-ray are the lateral and axial views. Each view offers a different perspective of the calcaneus.
Lateral Heel X-Ray View
The lateral view is the most frequently used projection to assess the overall structure of the heel.
- Purpose: To visualize the calcaneus in profile, allowing for assessment of fractures, bone spurs (calcaneal spurs), and soft tissue structures.
- Patient Positioning:
- The patient should be positioned either sitting or lying on their side (lateral decubitus).
- The affected leg should be extended, and the opposite leg flexed and placed behind the affected leg for stability.
- The foot should be dorsiflexed (toes pulled towards the shin) as much as comfortably possible.
- The medial side of the foot should be placed against the image receptor (IR).
- Ensure the ankle and heel are in true lateral position.
- Central Ray (CR): Perpendicular to the IR, directed to the calcaneus.
- Technical Factors: Adjust exposure factors (kVp and mAs) to ensure optimal image quality without overexposure.
Axial Heel X-Ray View
The axial view provides a superior-inferior view of the calcaneus, revealing its width and shape.
- Purpose: To evaluate for fractures, bone spurs (especially plantar calcaneal spurs), and joint space narrowing.
- Patient Positioning:
- The patient can be sitting or standing.
- The leg is extended.
- The foot is dorsiflexed as much as possible. This can be aided by having the patient pull on a bandage or towel wrapped around their toes.
- The plantar surface of the foot should be as perpendicular to the image receptor (IR) as possible. This maximizes visualization of the calcaneus.
- Central Ray (CR): Angled approximately 40 degrees cephalad (towards the head), entering the plantar surface of the heel.
- Technical Factors: Proper exposure factors are crucial for penetrating the dense bone of the heel.
Ensuring Proper "Heel X Ray Position": Key Considerations
Achieving accurate "heel x ray position" requires careful attention to detail. Consider the following:
- Patient Comfort: Ensure the patient is as comfortable as possible to minimize movement during the exposure. Use cushions or supports as needed.
- Clear Instructions: Provide clear and concise instructions to the patient regarding positioning.
- Immobilization: If the patient is unable to maintain the desired position, use immobilization devices such as sandbags or tape.
- Collimation: Restrict the X-ray beam to the area of interest (heel) to minimize radiation exposure.
- Shielding: Use lead shielding to protect the patient’s gonads and other sensitive areas.
Common Mistakes and How to Avoid Them
Several common mistakes can affect the quality of the "heel x ray position". Being aware of these pitfalls can help you avoid them.
| Mistake | How to Avoid It |
|---|---|
| Rotation of the foot (lateral) | Ensure the medial side of the foot is flat against the image receptor. |
| Insufficient dorsiflexion | Use a bandage or towel to help the patient pull their toes upwards. |
| Incorrect CR angle (axial) | Use a goniometer or measuring device to ensure the correct 40-degree cephalad angle. |
| Over or Underexposure | Carefully select appropriate exposure factors based on patient size and bone density. |
By following these guidelines, healthcare professionals can consistently achieve high-quality heel X-rays, leading to more accurate diagnoses and improved patient care.
Heel X-Ray Position FAQs
Here are some frequently asked questions about heel x-ray positioning to help clarify the process.
Why is proper heel x-ray position important?
Accurate heel x-ray position is crucial for obtaining clear and diagnostic images. Proper positioning ensures the correct anatomical structures are visualized, allowing for accurate diagnosis of conditions affecting the heel, such as fractures, arthritis, or bone spurs. A poorly positioned heel x ray can lead to misdiagnosis and incorrect treatment.
What are the standard views for a heel x-ray?
The most common views for a heel x-ray include the lateral (side) view and the axial (plantodorsal) view. These views provide complementary information about the heel bone (calcaneus) and surrounding tissues. Sometimes, oblique views are also taken to further assess specific areas of concern. Each view requires a precise heel x ray position.
What patient instructions are typically given before a heel x-ray?
Patients are generally instructed to remove any metal objects, such as jewelry or buckles, from the area being imaged. They will also be asked to remain still during the x-ray exposure to avoid blurring the image. The technologist will explain the required heel x ray position and may use supports to help maintain the correct alignment.
Are there any risks associated with a heel x-ray?
Like all x-rays, there is a minimal risk of radiation exposure associated with a heel x-ray. However, the amount of radiation is very low and the benefits of obtaining a diagnosis typically outweigh the risks. Pregnant women should always inform their doctor or x-ray technologist before undergoing any x-ray procedure, as radiation exposure can be harmful to the fetus. Proper shielding is used to minimize exposure in all patients, particularly regarding reproductive organs. Good heel x ray position also minimizes repeat exposures.
And that wraps up our guide on the heel x ray position! Hopefully, you feel more confident about what goes into getting a good image. If you found this helpful, pass it on! Good luck with your future x-rays!